The Geologically Improbable Railroad
Structures
[ Home ] [ Up ] [ Previous
Picture ] [ Next Picture
]
At long last, some structures have begun to appear on the GIRR.
Of necessity, most of the structures are scratchbuilt because its
hard to find 1:29 or 1:32 scale kits. Also, the structures are all
intended to be left out in the weather all the time, so that the
construction techniques that are available are somewhat
limited.
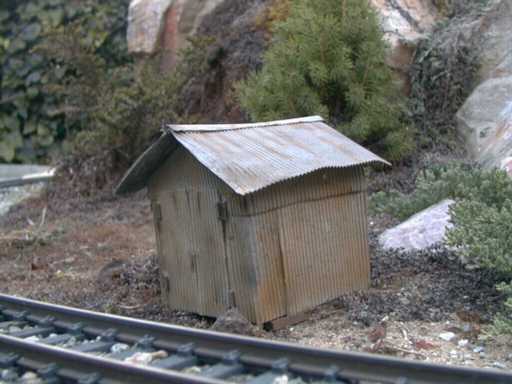 The first building to appear
on the GIRR was this little tin shack made from corrugated aluminum cans. At
the time that this picture was taken, the building had been outside
for about 2-1/2 years. During that time, its painted weathering had
been naturally weathered such that the artificial weathering had to
be done again. Other than that, it has held up well.
The first building to appear
on the GIRR was this little tin shack made from corrugated aluminum cans. At
the time that this picture was taken, the building had been outside
for about 2-1/2 years. During that time, its painted weathering had
been naturally weathered such that the artificial weathering had to
be done again. Other than that, it has held up well.
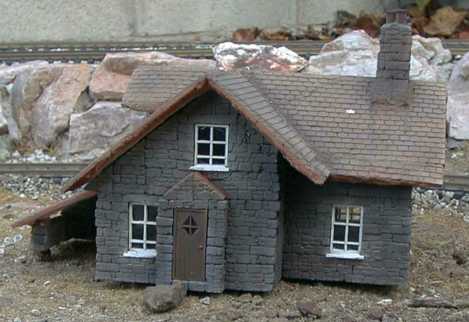 A JigStones farmhouse was the
second building to be placed on the layout. For the time being,
"placed" is the right term. No attempt has been made to integrated
it into the surroundings until a little more development takes
place. For right now, its getting naturally weathered. The Floquil
paint used to paint and weather the building is being weathered
itself and the roof is heavily faded.
A JigStones farmhouse was the
second building to be placed on the layout. For the time being,
"placed" is the right term. No attempt has been made to integrated
it into the surroundings until a little more development takes
place. For right now, its getting naturally weathered. The Floquil
paint used to paint and weather the building is being weathered
itself and the roof is heavily faded.
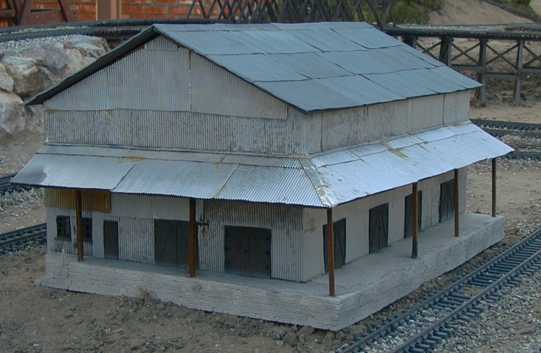 The next structure was this
warehouse also made from
corrugated aluminum cans. This structure covers an awful mess of
wiring out in the middle of the layout.
The next structure was this
warehouse also made from
corrugated aluminum cans. This structure covers an awful mess of
wiring out in the middle of the layout.
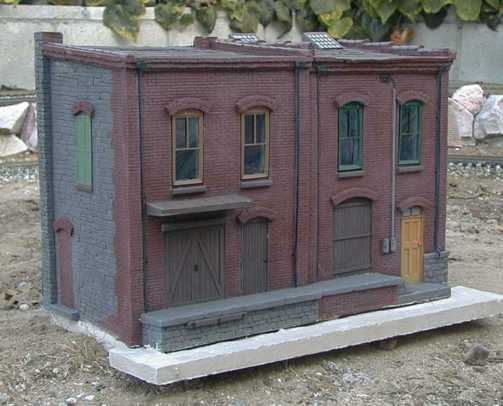
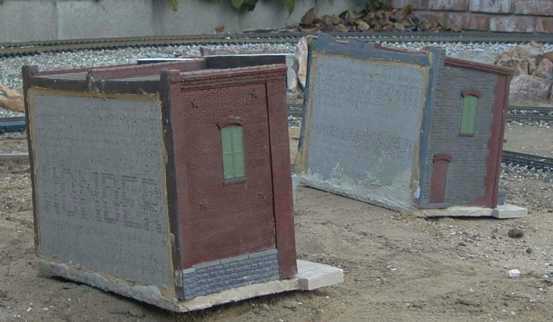
 This set of storefronts
is a Mountains-In-Minutes polyurethane foam building front. The
structure has three walls and a roof. The buildings come with metal
window frames and cellophane window glazing. They are painted
primer gray. The detail on this inexpensive ($40) building is very
good, I really liked the moldwork. It is also quite sturdy as the
walls are nearly an inch thick. It is also acceptably close to 1:29
scale based on the door size that I thought it would look good on a
1955 vintage 1/29 scale layout as a 60 year old building.
This set of storefronts
is a Mountains-In-Minutes polyurethane foam building front. The
structure has three walls and a roof. The buildings come with metal
window frames and cellophane window glazing. They are painted
primer gray. The detail on this inexpensive ($40) building is very
good, I really liked the moldwork. It is also quite sturdy as the
walls are nearly an inch thick. It is also acceptably close to 1:29
scale based on the door size that I thought it would look good on a
1955 vintage 1/29 scale layout as a 60 year old building.
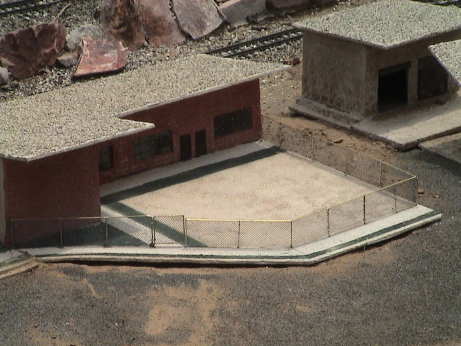
 Another building is
this set of building backs. The set is designed so that they can be
glued together into a single building but since they would not be
visible on the "back" side, I elected to leave the backs plain. The
sidewalks on both buildings were made from RapidSet cement cast in
a wooden form around the Wonderboard floor.
Another building is
this set of building backs. The set is designed so that they can be
glued together into a single building but since they would not be
visible on the "back" side, I elected to leave the backs plain. The
sidewalks on both buildings were made from RapidSet cement cast in
a wooden form around the Wonderboard floor.
 The backs were filled
with WonderBoard, a concrete and fiberglass product designed to
back tilework. WonderBoard scribes and breaks well and can be found
in most homeowner stores. Another piece of WonderBoard is used as a
floor. Both pieces of WonderBoard are glued in place with liberal
amounts of Liquid Nails adhesive. Since WonderBoard is very porous
on the broken edges, I sealed the edges with a layer of RapidSet
cement.
The backs were filled
with WonderBoard, a concrete and fiberglass product designed to
back tilework. WonderBoard scribes and breaks well and can be found
in most homeowner stores. Another piece of WonderBoard is used as a
floor. Both pieces of WonderBoard are glued in place with liberal
amounts of Liquid Nails adhesive. Since WonderBoard is very porous
on the broken edges, I sealed the edges with a layer of RapidSet
cement.
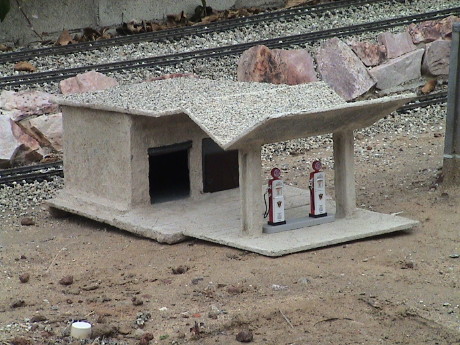 WonderBoard worked out
well for me. I originally built this building in 2000
as a test article with no intent of actually using it. By 2008, it
had been sitting on the GIRR all that time with only a little dirt
on it to show it's age. A blast with a hose took care of the dirt.
Then I converted it to a gas station.
WonderBoard worked out
well for me. I originally built this building in 2000
as a test article with no intent of actually using it. By 2008, it
had been sitting on the GIRR all that time with only a little dirt
on it to show it's age. A blast with a hose took care of the dirt.
Then I converted it to a gas station.
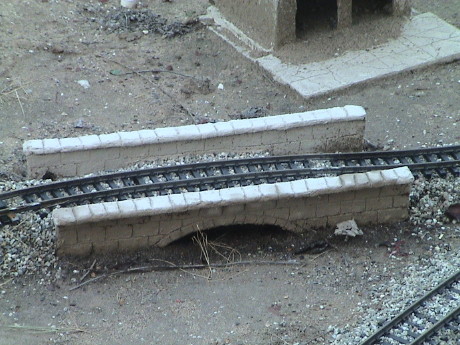 WonderBoard had shown is ability to withstand the weather so I also
built a viaduct
out of WonderBoard. It was a quick and dirty project, but it came
out well enough.
WonderBoard had shown is ability to withstand the weather so I also
built a viaduct
out of WonderBoard. It was a quick and dirty project, but it came
out well enough.
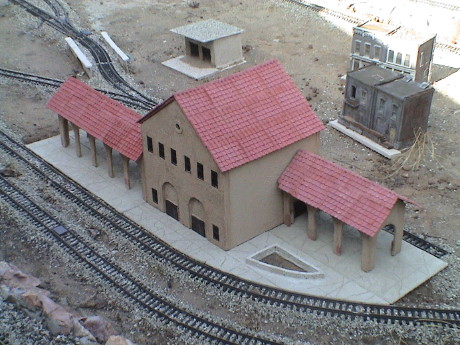 With the success of the viaduct under my
belt, I launched on a long planned major project, a Santa Fe style mission
station. The project also came out well. I had intended the
building to be imposing, but I got a little more than I
expected.
With the success of the viaduct under my
belt, I launched on a long planned major project, a Santa Fe style mission
station. The project also came out well. I had intended the
building to be imposing, but I got a little more than I
expected.
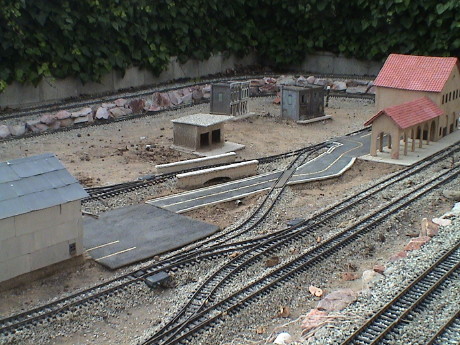 The
station needed some access, so I started building asphalt roads from
WonderBoard. These came out pretty well to, but I'm going to build
the next batch of roads with a different method.
The
station needed some access, so I started building asphalt roads from
WonderBoard. These came out pretty well to, but I'm going to build
the next batch of roads with a different method.
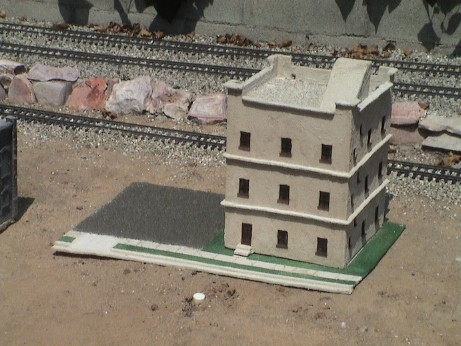 I
still needed more structures, so I have built a hotel, also made
from WonderBoard.
I
still needed more structures, so I have built a hotel, also made
from WonderBoard.
The building uses pretty much normal WonderBoard construction
methods. The windows are resin castings initially held in place
with small drops of Zap-A-Gap CA at the corners. The glazing is
clear styrene which has been "frosted" with a CA kicker. After the
CA has dried, a fillet of plumber's epoxy is applied on the
backside to seal the windows and to firmly adhere them to the
structure. All access is via the bottom as the roof is firmly
cemented in place, both to strengthen and seal the structure. The
roof is sloped to the rear and drain holes and "downspouts" were
provided to allow rain to drain off the building.
The base is a sheet of WonderBoard with a cutout for the
driveway. The parking lot is A-1 Grit C-71 mixed with RapidSet (2/3
grit, 1/3 cement) and dry spread then wet down. A little more grit
was spread on and held in place with TiteBond II and water (50/50).
The "grass" is fine DG dry spread and bonded with TiteBond II and
then painted with Rustoleum. The paint is thin in spots to allow
the tan color of the DG to show through to simulate dead grass.
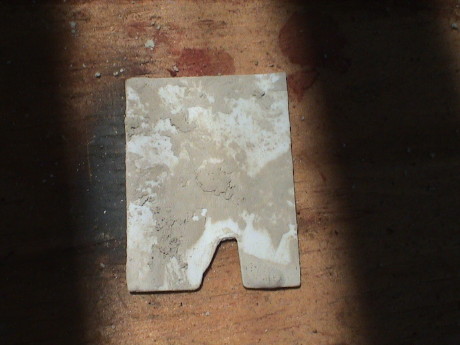 The ledges around
the building were formed from concrete skived to shape with this
styrene tool. Styrene makes a good skiving tool because it can be
easily cut to shape. If made thin enough, this one is 0.030" which
is about right, it can be simply flexed to break off the concrete
that adheres to it. Building the ledges was a two pass process.
First a bead of cement if formed by hand to the rough shape of the
ledge and then the tool is drawn down the bead to remove any
excess. There will be low spots and holes. These will be filled in
during the second pass after the cement from the first pass has set
up. After the first pass has set, more cement is added where needed
and the the skiving tool is used again to remove excess and to
detect the remaining low spots that need to be filled in. Skiving
should be done only minutes after the cement is applied or it will
be too late.
The ledges around
the building were formed from concrete skived to shape with this
styrene tool. Styrene makes a good skiving tool because it can be
easily cut to shape. If made thin enough, this one is 0.030" which
is about right, it can be simply flexed to break off the concrete
that adheres to it. Building the ledges was a two pass process.
First a bead of cement if formed by hand to the rough shape of the
ledge and then the tool is drawn down the bead to remove any
excess. There will be low spots and holes. These will be filled in
during the second pass after the cement from the first pass has set
up. After the first pass has set, more cement is added where needed
and the the skiving tool is used again to remove excess and to
detect the remaining low spots that need to be filled in. Skiving
should be done only minutes after the cement is applied or it will
be too late.
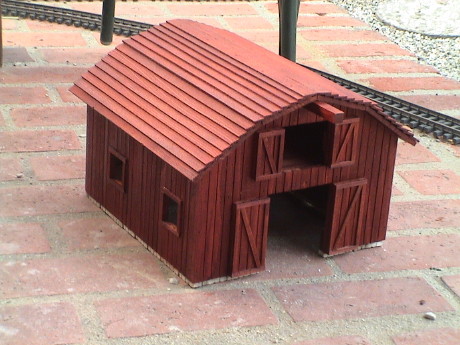
 On June 24, 2008 another building
appeared. This is a redwood barn purchased from Comstock Construction Company. I've
concluded that I don't want to scratch build everything. The
building needs a light coat of redwood stain and maybe a coat of
water sealer. The building didn't come with the foundation, I added
that from Jigstones flat block glued on with TiteBond III. Putting
wood, even redwood, directly on the ground is not a good plan.
On June 24, 2008 another building
appeared. This is a redwood barn purchased from Comstock Construction Company. I've
concluded that I don't want to scratch build everything. The
building needs a light coat of redwood stain and maybe a coat of
water sealer. The building didn't come with the foundation, I added
that from Jigstones flat block glued on with TiteBond III. Putting
wood, even redwood, directly on the ground is not a good plan.
The barn will cover and conceal the sprinkler riser that will
eventually be a drip irrigation distribution point for that region
of the layout.
 The barn did receive a coat of
redwood stain and an overcoat of Thompson's Water Seal. The stain
was one intended for redwood outdoor furniture, it took care of the
"white" redwood. I initially started to brush it on, but it was
hard to get in the slots cut into the siding and around the details
of the doors. I did most of it with an airbrush so I could get the
stain in every nook and cranny. The water seal came in a aerosol
can so it was just sprayed on. We'll see what natural weathering
does to this structure.
The barn did receive a coat of
redwood stain and an overcoat of Thompson's Water Seal. The stain
was one intended for redwood outdoor furniture, it took care of the
"white" redwood. I initially started to brush it on, but it was
hard to get in the slots cut into the siding and around the details
of the doors. I did most of it with an airbrush so I could get the
stain in every nook and cranny. The water seal came in a aerosol
can so it was just sprayed on. We'll see what natural weathering
does to this structure.
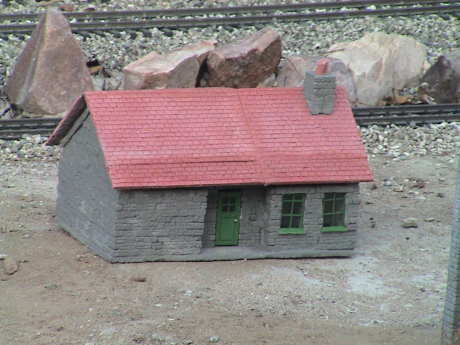 This is a JigStones house. I need a
few places for my townsfolk to live. JigStones are a little
expensive to get started with as the mold sets have become somewhat
expensive, but the incremental cost of building construction is
quite low even though the labor content is somewhat high. For
outdoor use, I cast the blocks in RapidSet concrete. I am using
Liquid Nails to assembled it. I used Liquid Nails on the farmhouse
described above and it's been out in the weather for 10 years and
it hasn't come apart. Lexel is actually a better adhesive, but I
didn't have any and Liquid Nails is cheap, about $3 for a caulking
gun sized tube.
This is a JigStones house. I need a
few places for my townsfolk to live. JigStones are a little
expensive to get started with as the mold sets have become somewhat
expensive, but the incremental cost of building construction is
quite low even though the labor content is somewhat high. For
outdoor use, I cast the blocks in RapidSet concrete. I am using
Liquid Nails to assembled it. I used Liquid Nails on the farmhouse
described above and it's been out in the weather for 10 years and
it hasn't come apart. Lexel is actually a better adhesive, but I
didn't have any and Liquid Nails is cheap, about $3 for a caulking
gun sized tube.
The other JigStones work that I have done didn't start out on a
base. This time I made a base from WonderBoard to start with and it
made a significant difference in the ease of assembly of the
structure. I could turn in on the workbench to work on the various
sides without disturbing joints that hadn't fully set up. The base
will also improve the structural integrity of the structure.
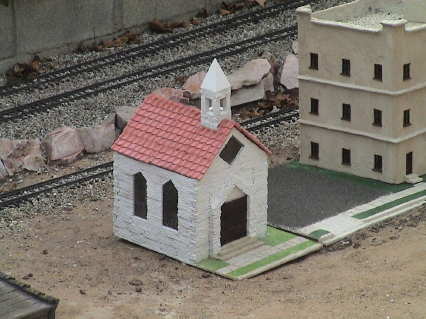 The town needs a church and it looked like it would be an
interesting JigStones project. I assembled this one with Liquid
Nails for Marble up to the top of the sidewalls, then I ran out.
The hardware store didn't have any more of that kind so I used
Liquid Nails Heavy Duty. This stuff is actually easier to work
with. It's not as stiff and spreads better and sets up quicker. The
slop from the adhesive doesn't actually matter too much as Liquid
Nails takes paint well and the slop doesn't show after a coat of
Rustoleum spray paint or primer. Anything that does get on the
front of the blocks needs to be immediately smoothed and spread so
that it doesn't mask the texture of the "rock work."
The town needs a church and it looked like it would be an
interesting JigStones project. I assembled this one with Liquid
Nails for Marble up to the top of the sidewalls, then I ran out.
The hardware store didn't have any more of that kind so I used
Liquid Nails Heavy Duty. This stuff is actually easier to work
with. It's not as stiff and spreads better and sets up quicker. The
slop from the adhesive doesn't actually matter too much as Liquid
Nails takes paint well and the slop doesn't show after a coat of
Rustoleum spray paint or primer. Anything that does get on the
front of the blocks needs to be immediately smoothed and spread so
that it doesn't mask the texture of the "rock work."
The church entry is a built up door that is attached to the
front. The windows are glass cut to shape backed with photographs
of real church stained glass windows printed on transparency
material. The large diamond shaped window in the front is also a
stained glass simulation, however the one in back is clear just to
let in more light so that the rest of the stained glass shows up
better.
The "grass" is a colored sand that I found at Cost Plus Imports.
There is a little yellow mixed in with the green. There are more
details of the construction at my JigStones Tips page.
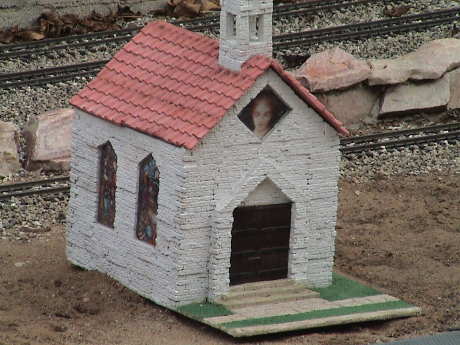 I
wasn't happy with the way that the stained glass windows turned
out, they were way too dark. When I illuminated the building with
two #53 bulbs in series (recovered from heavyweight passenger cars
that got LEDs instead), I found that I could see one directly
through the front window. I put a piece of regular white printer
paper behind it to diffuse the light and that worked fine. The next
day, I realized that the paper was also reflecting the daylight
that went in through that window and it made the image on the
transparency visible in direct sunlight. I did the same thing to
the other four windows and now the stained glass windows work both
at night and in direct sunlight.
I
wasn't happy with the way that the stained glass windows turned
out, they were way too dark. When I illuminated the building with
two #53 bulbs in series (recovered from heavyweight passenger cars
that got LEDs instead), I found that I could see one directly
through the front window. I put a piece of regular white printer
paper behind it to diffuse the light and that worked fine. The next
day, I realized that the paper was also reflecting the daylight
that went in through that window and it made the image on the
transparency visible in direct sunlight. I did the same thing to
the other four windows and now the stained glass windows work both
at night and in direct sunlight.
 There is one spot on the
GIRR branch line to the garage where a serious contamination
problem has existed since the construction of the railroad. The
area, and the track that goes through it, gets covered in pigeon
poop. This is not only an unsightly mess, but the stuff causes
derailments and power pickup problems. I find that city regulations
prevent me from shooting or poisoning the pigeons so I have to live
with them or risk a fine.
There is one spot on the
GIRR branch line to the garage where a serious contamination
problem has existed since the construction of the railroad. The
area, and the track that goes through it, gets covered in pigeon
poop. This is not only an unsightly mess, but the stuff causes
derailments and power pickup problems. I find that city regulations
prevent me from shooting or poisoning the pigeons so I have to live
with them or risk a fine.
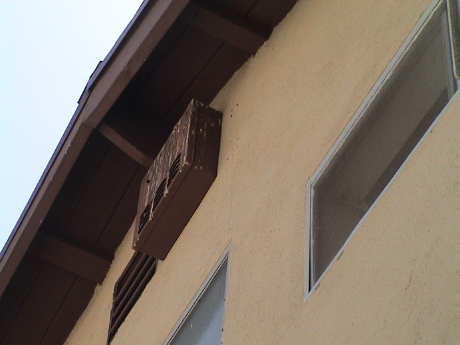 The source of the
problem is an alarm box near the peak of my roof. I should go up
there and put some wire up or something to keep the pigeons off of
it, but I'm not climbing that far up a ladder to get to it. There
have been pigeons nesting there almost continuously for over 20
years.
The source of the
problem is an alarm box near the peak of my roof. I should go up
there and put some wire up or something to keep the pigeons off of
it, but I'm not climbing that far up a ladder to get to it. There
have been pigeons nesting there almost continuously for over 20
years.
One early pair of pigeons tried to make their nest from used
nails. I kept finding rusty and bent nails, staples and other metal
construction scrap on the walkway. They were apparently selectively
collecting them from everywhere around. After a couple of years,
that problem subsided as different pigeons took over the nesting
site.
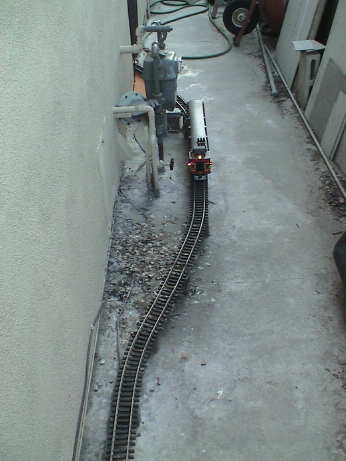
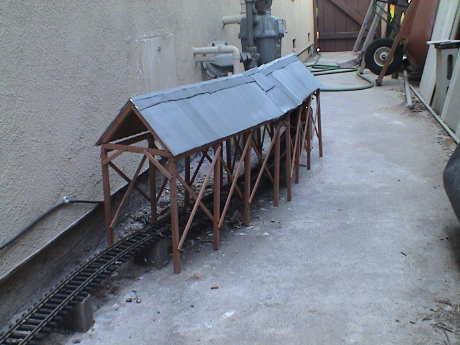 Instead, I built a snow shed to
protect the tracks from the falling guano. It is made in two 2'
sections and it covers the whole of the impacted track.
Instead, I built a snow shed to
protect the tracks from the falling guano. It is made in two 2'
sections and it covers the whole of the impacted track.
It only took one afternoon and the next morning to construct
these sheds. They are made of milled redwood assembled with
TiteBond III wood glue and nailed with a brad gun. The roof is crimped aluminum cut
from steam tray covers and attached to a door skin subroof with
Liquid Nails. The crimped aluminum is painted with a Rustoleum cold
galvanizing spray which is really just a high zinc content
primer.
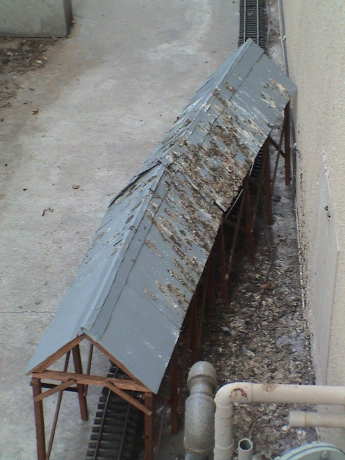 The shed has been in service for a
couple of months and it's taken a pounding. However, all that
pigeon poop ISN'T on my track.
The shed has been in service for a
couple of months and it's taken a pounding. However, all that
pigeon poop ISN'T on my track.
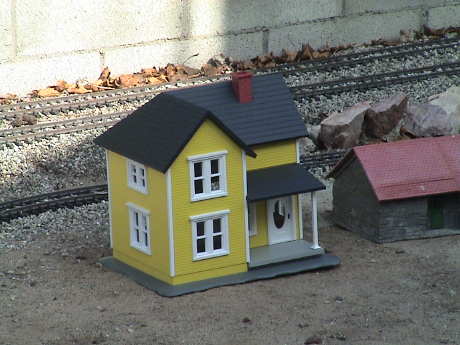 Not all the buildings
on the GIRR are scratchbuilt. This is an AristoCraft farmhouse. It
looks a little big for 1/29 scale based on the doors and windows,
but it is a good looking structure nonetheless. It is rated for
outdoor use and is fully assembled and painted. The model is built
from heavy plastic. The windows are glazed with clear thin plastic
and the floor is partially open.
Not all the buildings
on the GIRR are scratchbuilt. This is an AristoCraft farmhouse. It
looks a little big for 1/29 scale based on the doors and windows,
but it is a good looking structure nonetheless. It is rated for
outdoor use and is fully assembled and painted. The model is built
from heavy plastic. The windows are glazed with clear thin plastic
and the floor is partially open.
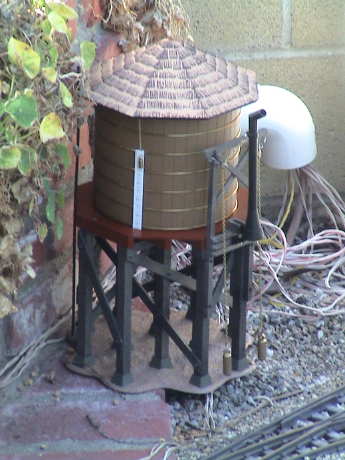 The AristoCraft water
tower also came fully painted and mostly assembled. The water level
and spout chains need to be attached by the user.
The AristoCraft water
tower also came fully painted and mostly assembled. The water level
and spout chains need to be attached by the user.
The tower actually functions. It will actually hold and dispense
liquids from a polyethylene tub inside. There is a valve that
controls the liquid flow (accessible with the roof removed) but
even if the valve is open, the contents will not flow out if the
spout is raised. There is also a functioning water level indicator
based on a couple of floating corks and a weighted chain.
Eventually, a scratchbuilt coaling facility will cover over the
wiring in the background.
 The next day, a
couple of more Aristo building showed up. This is the Gingerbread
House. It's smaller than the farmhouse and single story. It is,
however, illuminated. Inside the door, there is a switch. Two wires
lead from the bottom. The single bulb is mounted on a bracket that
illuminates the whole house fairly well. The bulb draws 45 mA and
18 volts.
The next day, a
couple of more Aristo building showed up. This is the Gingerbread
House. It's smaller than the farmhouse and single story. It is,
however, illuminated. Inside the door, there is a switch. Two wires
lead from the bottom. The single bulb is mounted on a bracket that
illuminates the whole house fairly well. The bulb draws 45 mA and
18 volts.
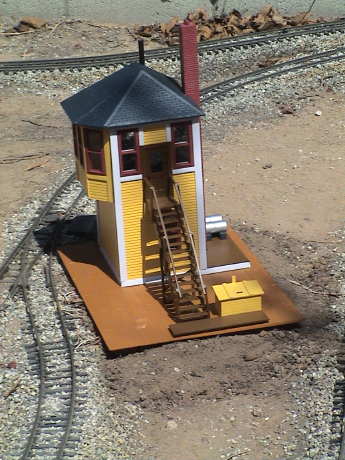 The Aristo
Interlocking Tower was larger than I thought it would be but it fit
where it was intended. It is also illuminated on both floors. The
bulbs draw 135 mA at 18 volts.
The Aristo
Interlocking Tower was larger than I thought it would be but it fit
where it was intended. It is also illuminated on both floors. The
bulbs draw 135 mA at 18 volts.
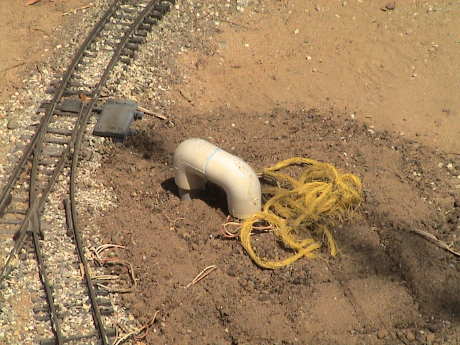 The tower was
intended to cover this electrical conduit and it's associated
wiring. I thought that the floor of the tower would be open like
the other Aristo buildings, but it was solid.
The tower was
intended to cover this electrical conduit and it's associated
wiring. I thought that the floor of the tower would be open like
the other Aristo buildings, but it was solid.
 However, with the
appropriate tools, anything can be hacked. I marked the floor
underneath with the extent of the area I could cut and used my
Makita recipro saw to cut out a hole in the floor. The floor itself
is pretty substantial. It is made of about 1/8" heavy crossbraced
plastic (some kind of phenolic based on the odor while cutting it),
1/4" of foam and then a thin plastic formed sheet representing the
floor. One of the cutouts can be seen on the table.
However, with the
appropriate tools, anything can be hacked. I marked the floor
underneath with the extent of the area I could cut and used my
Makita recipro saw to cut out a hole in the floor. The floor itself
is pretty substantial. It is made of about 1/8" heavy crossbraced
plastic (some kind of phenolic based on the odor while cutting it),
1/4" of foam and then a thin plastic formed sheet representing the
floor. One of the cutouts can be seen on the table.
 All those structures in the town
were intended to be lined up on a road. After being on the to-do
list for 12 years, the road finally went in. I waited until I was
sure that I would not have to tear it up to lay electrical lines
for the building lighting or water lines for the drip irrigation
system. These utilities are in place now so it was "safe" to lay
the road. It is made of dark gray colored rock grit laid down over
bare hard packed dirt and glued with a 50/50 mix of TiteBond II and
water. It took about two hours to install the road, this method
goes pretty quickly.
All those structures in the town
were intended to be lined up on a road. After being on the to-do
list for 12 years, the road finally went in. I waited until I was
sure that I would not have to tear it up to lay electrical lines
for the building lighting or water lines for the drip irrigation
system. These utilities are in place now so it was "safe" to lay
the road. It is made of dark gray colored rock grit laid down over
bare hard packed dirt and glued with a 50/50 mix of TiteBond II and
water. It took about two hours to install the road, this method
goes pretty quickly.
Where the road vanishes at the lower right, it goes into a
tunnel portal with the cement block wall behind it painted black.
It doesn't make much sense to have a road in town that doesn't go
anywhere.
The drainage culvert in the foreground is a piece of thinwall
sprinkler pipe painted primer gray on the ends.
Near the far end is a grade crossing into the parking lot of the
main passenger station. I put this down about a year ago as a test.
The first foot leading away from the track was also put down then.
I've been walking all over it on purpose to see if it would be
durable and it is none the worse for wear. I expect that the road
will also be a foot path to get into the town area so the road has
to be durable enough to support a 1:1 scale person. Eventually,
I'll stripe it too with yellow tinted cement like I did the
Wonderboard road sections.
 As the road leaves
town, it dives into a Jigstones tunnel portal with the cement block
wall behind it painted black. It doesn't make much sense to have a
road in town that doesn't go anywhere.
As the road leaves
town, it dives into a Jigstones tunnel portal with the cement block
wall behind it painted black. It doesn't make much sense to have a
road in town that doesn't go anywhere.
 The latest structure is a
50's era school with three classrooms, and office and a play yard.
I still need to add some play equipment but otherwise, it's done.
It is built from WonderBoard and Rapid Set concrete mostly. The
texturing in the play yard is DG held down with glue, some of it
painted green to simulate grass. The fence is 1/8" hardware cloth
soldered to 1/16" brass rod. It is set in holes drilled into the
wonderboard base and secured with plumber's epoxy putty. The
building is illuminated with two #53 bulbs wired in series to light
up the interior and four warm white LEDs, running at just 2 mA,
wired in series to light up the exterior.
The latest structure is a
50's era school with three classrooms, and office and a play yard.
I still need to add some play equipment but otherwise, it's done.
It is built from WonderBoard and Rapid Set concrete mostly. The
texturing in the play yard is DG held down with glue, some of it
painted green to simulate grass. The fence is 1/8" hardware cloth
soldered to 1/16" brass rod. It is set in holes drilled into the
wonderboard base and secured with plumber's epoxy putty. The
building is illuminated with two #53 bulbs wired in series to light
up the interior and four warm white LEDs, running at just 2 mA,
wired in series to light up the exterior.
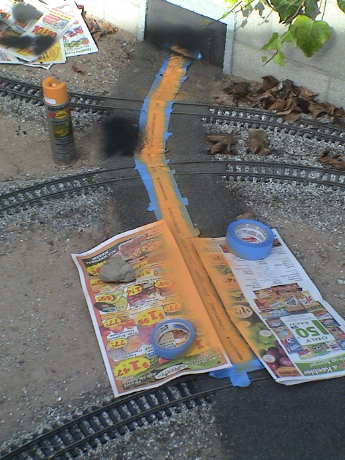 I found some Rustoleum
"inverted marking paint" that matched the color that highway
departments use to mark roadways. The inverted part of the name
describes the nozzle of the rattle can. It is intended to be used
to paint facing downward.
I found some Rustoleum
"inverted marking paint" that matched the color that highway
departments use to mark roadways. The inverted part of the name
describes the nozzle of the rattle can. It is intended to be used
to paint facing downward.
I masked the road with blue painter's tape and laid newspaper
strips over the tape to prevent overspray.
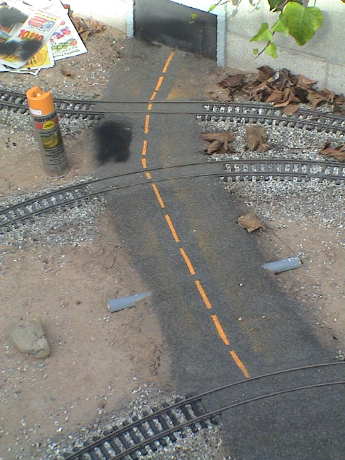 The stripe looks pretty
good... except that I didn't get one part properly centered and
some paint actually got under the newspaper masking. I'll have to
tape that down better next time.
The stripe looks pretty
good... except that I didn't get one part properly centered and
some paint actually got under the newspaper masking. I'll have to
tape that down better next time.
Sometimes "marking" paint is designed to fade after a month or
so that the markings naturally go away. We'll see what this stuff
does before I paint the rest of it.
The black spot was a test of overpainting some of the orange
overspray with black primer. If this doesn't fade, I'll just add
another thin layer of the black grit to the surface and glue it
down. If the orange paint doesn't fade, I'll overcoat the orange
overspray as well and widen the road a little in that section, it
looks like it might be a little narrow anyway.
 The next morning, I patched
it. I still need a little more around the edges of the black patch
and I'll probably cover over and re-stripe the two closest
segments. This road building method allows easy patching.
The next morning, I patched
it. I still need a little more around the edges of the black patch
and I'll probably cover over and re-stripe the two closest
segments. This road building method allows easy patching.
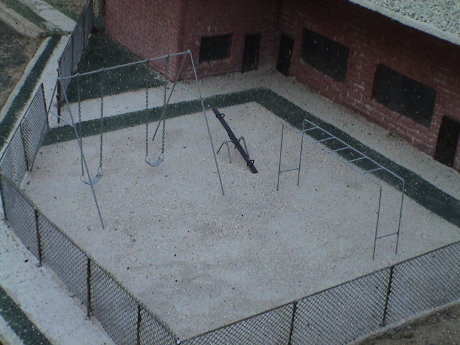 The school that
I finished a few months ago didn't have any play equipment in the
school yard. I assembled this swing set in about a half an hour
from brass rod and strip. The chain is a costume jewelry piece and
the straps on the swing seats are 28 ga solid copper wire. All the
joints are soldered. The whole works was painted with a primer gray
rattle can.
The school that
I finished a few months ago didn't have any play equipment in the
school yard. I assembled this swing set in about a half an hour
from brass rod and strip. The chain is a costume jewelry piece and
the straps on the swing seats are 28 ga solid copper wire. All the
joints are soldered. The whole works was painted with a primer gray
rattle can.
The swing set was easy enough to do such that I spent another
half hour (including letting the paint dry) assembling a teeter
totter. It is also built with brass strip and rod. The hinges
underneath and the handles are made from 18 ga copper wire.
The jungle gym was made from soldered brass rod and painted with primer gray. That was the easiest of the three, assembly took maybe 10 minutes.
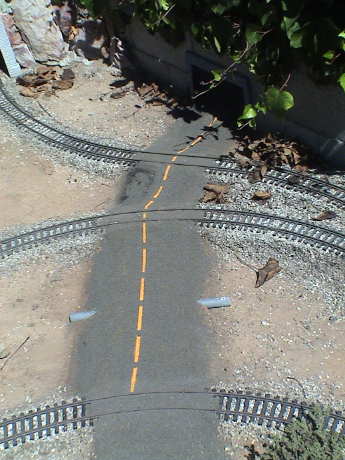
 On Feb 16, 2010, I finished striping the road. The paint on the section at the far end had been there since September 09 and it hadn't faded a bit so I did the rest. However, first I widened the road a little at the grade crossing where the striping was off center. The paint was in the wrong place and the road was too narrow so the obvious solution was to simply add more road on one side. The paint dries in about 2 minutes, each section got two light coats so that the paint was never actually wet enough to run under the masking. The same day I widened the road, I patched the edges in front of "boot hill" and the school. These glued chicken grit roads are quick and easy to patch. This appears to be the hot setup for a road. The roadway also survived the heaviest rains that we've seen in a decade with just some scattered dirt being washed off of it.
[ Home ] [ Up ] [ Previous
Picture ] [ Next Picture
]
© 1999-2010 George Schreyer
Created Aug 22, 2000
Last Updated February 16, 2010